
All of the patterns and example images from the tutorial are free to use for any creative purpose. You may not re-package or re-sell as resources.
Text content of the tutorial may not be re-used or reprinted without written permission.
Warning: This tutorial is long and image heavy.

Program: Paint Shop Pro (Any version)
Difficulty: Beginner to Intermediate (Tutorial has multiple methods; some may be easier than others, but detailed explanations are provided)
Translatable: Partly (Methods 2 and 4 should work in any program that has basic selection tools and an offset filter/effect.)
Difficulty: Beginner to Intermediate (Tutorial has multiple methods; some may be easier than others, but detailed explanations are provided)
Translatable: Partly (Methods 2 and 4 should work in any program that has basic selection tools and an offset filter/effect.)
Method 1: Stripes Using The Halftone Effect
The quickest way to make a striped background in PSP is with the halftone effect. It only takes a few minutes, and there are a lot of options you can play around with. Photoshop has a couple of halftone filters, but as far as I can tell, none of them will work this way.
For a complete look at the way the halftone effect works, you can check out this quick tip in my PSP Basics series.
- 1. File>New.
There are instructions and screenshots for creating a new image here if you need them. I used 1000x1000 for the tutorial because it's easier to work with, but any size is fine. Just remember that you may have to adjust your settings for a larger image.
- 2. Flood fill your image with a background color.
The halftone effect won't work on a transparent background, so you need to give the image a colored background. Use the paint bucket and choose any color other than black or white. It won't matter what color you choose; you can change it inside the halftone dialog box.
Instructions on picking colors and using the materials palette are here if you need them.
- 3. Effects>Artistic Effects>Halftone.
Chose the "Line" pattern and select "grayscale" at the side. If you're confused, visit my halftone quicktip for screenshots and a detailed explanation. By altering the size of the pattern and the screen angles, you can create a variety of different looks.
- Here are some results I got and the settings I used for them.
The settings for these were mostly random choices. I wanted to show some of the most useful ways to utilize halftones, but there's no particular reason for the pattern sizes or opacities I used. Experiment to find settings you like best.

This is the starting background color used in all the examples 
Background: Transparent
Pattern Size: 50
Screen Angle: 45
Pattern Color: White
Pattern Opacity: 57
Screenshot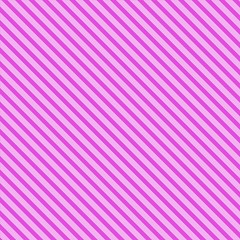
Background: Transparent
Pattern Size: 12
Screen Angle: 45
Pattern Color: White
Pattern Opacity: 48
Screenshot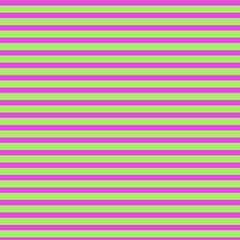
Background: Transparent
Pattern Size: 26
Screen Angle: 90
Pattern Color: Light Green
Pattern Opacity: 100
Screenshot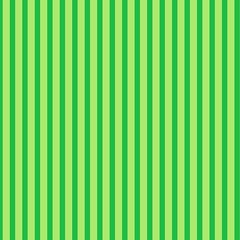
Background: Green
Pattern Size: 25
Screen Angle: 45
Pattern Color: Light Green
Pattern Opacity: 100
Screenshot
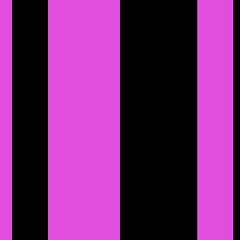
Method 2: Create a Pattern Using the Selection Tools.
So, the halftone tool definitely has its uses, but method 1 limits you to two colors, and you can't work on a transparent background. If you want something more flexible, here's a quick way to create a stripe pattern using the selection tools.
- 1. Create a new image.
I like to make my patterns larger than I think I need. PSP lets you change the scale and angle of a pattern quite easily, and I find that it's always simpler to create something larger and scale it down as needed. With stripes I also want dimensions I can divide easily, So I chose 500x500 with a transparent background and a resolution of 300 pixels per inch.
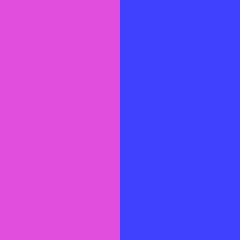
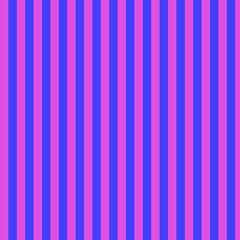
- 2. Create a selection on one half of the canvas
Choose the rectangular marquee tool and then click the custom selection box at the top of your workspace.
Enter these settings:
Top: 0
Left:0
Bottom: 500
Right: 250
This will give you a repeating pattern with two stripes; if you want to add more stripes or different colors, you can change the value for the left or right edges of the selection.
- Another way to do this is by going to using a grid to make your selection.
A grid is useful if you don't know exactly how wide you want the stripes but want them to be even.
Go to View>Grid
Then go to View>Change Grid, Guide and Snap Properties if you need to change the size of the grid.
To make your selection stay aligned to the grid cells, choose View>Snap to Grid
- Saving Your Patterns
PSP doesn't have a proprietary document format for patterns the way photoshop does. There are no .pat files to create. Save your patterns in standard image formats. You can access them by placing them in your patterns folder or by opening them up in PSP. For more information on working with patterns, check my post on working with the materials palette here and/or my post on file locations here.
For a transparent pattern, save the file as a .png by going to File>Export>PNG optimizer.
Non-transparent patterns can usually be saved as .jpg files.
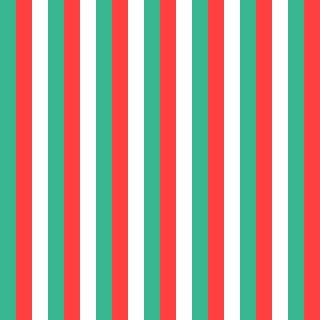
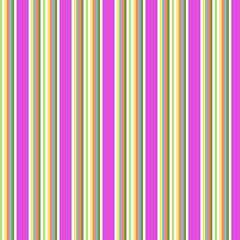
- Here are some example patterns I've made this way. The point is for them to be transparent, so I'm not including tiled examples because I'd have to add a background anyway.


Method 3: Create a Pattern Using "Add Borders" Feature
This is an easy way to make a striped pattern with varied widths if you aren't good at eyeballing selections and you don't want to spend a lot of time figuring out how big to make your canvas and where to place each selection.
It can get a little tedious, but to me it's no more so than making a lot of little selections with a grid or needing to make a dozen layers to get a pattern you want.
- 1. Create a new image
The width will vary depending on how big you want your first stripe. I usually make them anywhere between 10-100 px. The height doesn't need to be very big since the stripe will tile. I usually it around 200 px just so I can see what I'm working with. You can make it a lot smaller if you want to.
Use a solid color background this time and pick whatever color you want your stripe to be.
My settings are:
Width: 50px
Height: 200px
Resolution: 300px per inch
Background color: #4680ee
Screenshot
- 2. Image>Add borders
Make sure that the symmetric box is not checked.
Set the values for "top" and "bottom" to zero.
Change the left or right values however you want to create a stripe.
I just made a 10px white stripe to create this pattern.
Here's the result when you tile it:

Repeat this process until you have a pattern you like.
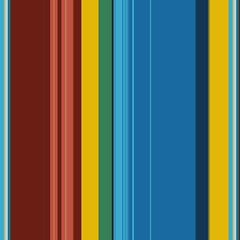
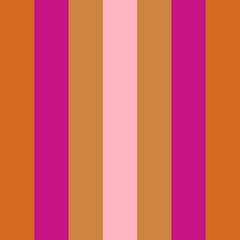
- 3. Here are some patterns I've made this way and what they will look like tiled:


Method 4: Stripes From An Image
This is useful when you have an image with colors you like. What you have to be careful of is resolution. Make sure that your starting image and the pattern(s) you make have the same resolution.
- 1. Find An Image With Colors You Like.
If you don't have one handy, check Pixabay.com for good quality public domain photos.
I'm choosing this one. I like bright colors and this picture has a lot of them.
- 2. Open the image in PSP and make any adjustments you want.
- 3. Go to Image>Decrease Color Depth>X Colors (4/8 Bit)
Reduce the colors until they're just high enough to keep the main colors you want. It will look terrible, but don't worry, it's not important to the stripes. We're going to use the offset filter to make stripes and create a pattern from that. If there are too many colors for the program to process, the colors kind of smear and you end up with a blurry pattern.
(I actually got a cool looking texture out of my blurry example by using unsharp mask, but it wouldn't work if I needed a striped background.)
- 4. Go to Effects>Image Effects>Offset.
Set your edge mode to repeat so that the stripes will look continuous.
For vertical stripes, set your horizontal offset to zero and push the vertical slider as far as it will go in either direction. Sometimes you can get vastly different results depending on whether you use a positive or negative offset. My image worked best with a negative offset.
If you have a big image like mine, you can use the selection tool to cut a piece to use as a pattern.
- Here's the pattern I ended up with and what it looks like tiled:

- And here are a couple of extras, both of which came from this image.


Tips And Techniques For Designing With Stripes
- The Materials Palette allows you to scale and change the angle of any pattern.
That means you can make all of these backgrounds with a single pattern tile. Some of them were made simply by altering the scale and angle. Others were made by layering existing backgrounds and playing with the blend modes. Instructions for working with the materials palette are here.
- Layering a few different stripe tiles over one another can create a completely new look.
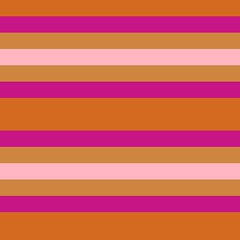
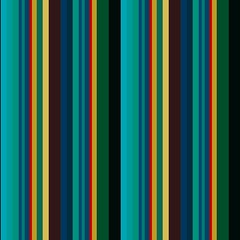
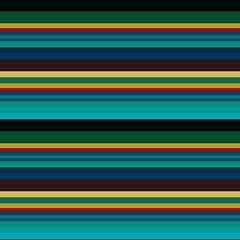
You can make backgrounds or even other stripe tiles this way. All of these were made using these tiles:
- Plaids
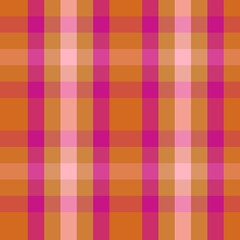
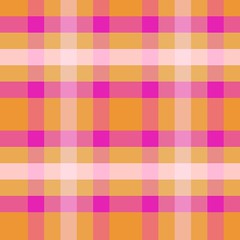
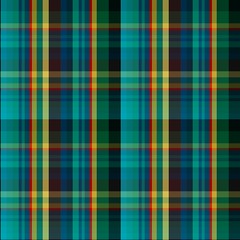
Plaid backgrounds can be created by using two layers of the same stripe pattern.
Set the angle of the pattern to 0 for the first layer and 90 for the second layer. Then lower the opacity or change the blend mode until you have something you like.
Examples:


- Starbursts
This is a retro type effect that I see used a lot for backgrounds. There are other ways to do it, but one of the easiest is to just start with a striped pattern.
Set your pattern so you get vertical stripes. Go to Effects>Distortion Effects>Polar Coordinates
Choose "rectangular to polar" and set your edge mode to repeat. (Screenshot.)
Sharpen if necessary. (Adjust>Sharpen>Sharpen)
The starburst will come out differently depending on whether you have even sized stripes or not.


It can get a little tedious, but to me it's no more so than making a lot of little selections with a grid or needing to make a dozen layers to get a pattern you want.
- 1. Create a new image
The width will vary depending on how big you want your first stripe. I usually make them anywhere between 10-100 px. The height doesn't need to be very big since the stripe will tile. I usually it around 200 px just so I can see what I'm working with. You can make it a lot smaller if you want to.
Use a solid color background this time and pick whatever color you want your stripe to be.
My settings are:
Width: 50px
Height: 200px
Resolution: 300px per inch
Background color: #4680ee
Screenshot - 2. Image>Add borders
Make sure that the symmetric box is not checked.
Set the values for "top" and "bottom" to zero.
Change the left or right values however you want to create a stripe.
I just made a 10px white stripe to create this pattern.
Here's the result when you tile it:
Repeat this process until you have a pattern you like. - 3. Here are some patterns I've made this way and what they will look like tiled:
Method 4: Stripes From An Image
This is useful when you have an image with colors you like. What you have to be careful of is resolution. Make sure that your starting image and the pattern(s) you make have the same resolution.
- 1. Find An Image With Colors You Like.
If you don't have one handy, check Pixabay.com for good quality public domain photos.
I'm choosing this one. I like bright colors and this picture has a lot of them.
- 2. Open the image in PSP and make any adjustments you want.
- 3. Go to Image>Decrease Color Depth>X Colors (4/8 Bit)
Reduce the colors until they're just high enough to keep the main colors you want. It will look terrible, but don't worry, it's not important to the stripes. We're going to use the offset filter to make stripes and create a pattern from that. If there are too many colors for the program to process, the colors kind of smear and you end up with a blurry pattern.
(I actually got a cool looking texture out of my blurry example by using unsharp mask, but it wouldn't work if I needed a striped background.)
- 4. Go to Effects>Image Effects>Offset.
Set your edge mode to repeat so that the stripes will look continuous.
For vertical stripes, set your horizontal offset to zero and push the vertical slider as far as it will go in either direction. Sometimes you can get vastly different results depending on whether you use a positive or negative offset. My image worked best with a negative offset.
If you have a big image like mine, you can use the selection tool to cut a piece to use as a pattern.
- Here's the pattern I ended up with and what it looks like tiled:
- And here are a couple of extras, both of which came from this image.
Tips And Techniques For Designing With Stripes
- The Materials Palette allows you to scale and change the angle of any pattern.
That means you can make all of these backgrounds with a single pattern tile. Some of them were made simply by altering the scale and angle. Others were made by layering existing backgrounds and playing with the blend modes. Instructions for working with the materials palette are here.
- Layering a few different stripe tiles over one another can create a completely new look.
You can make backgrounds or even other stripe tiles this way. All of these were made using these tiles:
- Plaids
Plaid backgrounds can be created by using two layers of the same stripe pattern.
Set the angle of the pattern to 0 for the first layer and 90 for the second layer. Then lower the opacity or change the blend mode until you have something you like.
Examples:
- Starbursts
This is a retro type effect that I see used a lot for backgrounds. There are other ways to do it, but one of the easiest is to just start with a striped pattern.
Set your pattern so you get vertical stripes. Go to Effects>Distortion Effects>Polar Coordinates
Choose "rectangular to polar" and set your edge mode to repeat. (Screenshot.)
Sharpen if necessary. (Adjust>Sharpen>Sharpen)
The starburst will come out differently depending on whether you have even sized stripes or not.
- 1. Find An Image With Colors You Like.
If you don't have one handy, check Pixabay.com for good quality public domain photos.
I'm choosing this one. I like bright colors and this picture has a lot of them. - 2. Open the image in PSP and make any adjustments you want.
- 3. Go to Image>Decrease Color Depth>X Colors (4/8 Bit)
Reduce the colors until they're just high enough to keep the main colors you want. It will look terrible, but don't worry, it's not important to the stripes. We're going to use the offset filter to make stripes and create a pattern from that. If there are too many colors for the program to process, the colors kind of smear and you end up with a blurry pattern.
(I actually got a cool looking texture out of my blurry example by using unsharp mask, but it wouldn't work if I needed a striped background.) - 4. Go to Effects>Image Effects>Offset.
Set your edge mode to repeat so that the stripes will look continuous.
For vertical stripes, set your horizontal offset to zero and push the vertical slider as far as it will go in either direction. Sometimes you can get vastly different results depending on whether you use a positive or negative offset. My image worked best with a negative offset.
If you have a big image like mine, you can use the selection tool to cut a piece to use as a pattern. - Here's the pattern I ended up with and what it looks like tiled:
- And here are a couple of extras, both of which came from this image.
Tips And Techniques For Designing With Stripes
- The Materials Palette allows you to scale and change the angle of any pattern.
That means you can make all of these backgrounds with a single pattern tile. Some of them were made simply by altering the scale and angle. Others were made by layering existing backgrounds and playing with the blend modes. Instructions for working with the materials palette are here. - Layering a few different stripe tiles over one another can create a completely new look.
You can make backgrounds or even other stripe tiles this way. All of these were made using these tiles:
- Plaids
Plaid backgrounds can be created by using two layers of the same stripe pattern.
Set the angle of the pattern to 0 for the first layer and 90 for the second layer. Then lower the opacity or change the blend mode until you have something you like.
Examples:
- Starbursts
This is a retro type effect that I see used a lot for backgrounds. There are other ways to do it, but one of the easiest is to just start with a striped pattern.
Set your pattern so you get vertical stripes. Go to Effects>Distortion Effects>Polar Coordinates
Choose "rectangular to polar" and set your edge mode to repeat. (Screenshot.)
Sharpen if necessary. (Adjust>Sharpen>Sharpen)
The starburst will come out differently depending on whether you have even sized stripes or not.
Good job!!!
ReplyDelete